For Legacy Centerstone employees This information is for employees who worked for Centerstone before the Centerstone-Brightli merger or new hires that have @centerstone.org email addresses.
Microsoft 365 Consolidation
One organization. One platform. One identity.
Between August 14 and 16, your account will be moved into Centerstone’s consolidated Microsoft 365 environment for easier collaboration across Centerstone.
Last updated August 18, 2026
Migration weekend
August 14 – 16
Friday evening through Sunday
What to expect August 14 – 16
Different services will be affected at different times. Not every Centerstone system will be unavailable all weekend.
By Friday, August 14
6 p.m. CT / 7 p.m. ETPrepare before migration
Make sure you are signed in to your Centerstone-issued computer. Close Outlook and OneDrive, then lock the computer and leave it powered on when possible. Do not restart or shut it down unless instructed by IT.
If you have shared files or folders from OneDrive, make sure you have run the sharing report before migration begins. Keep the report as a reference for sharing them again afterward.
Friday, August 14
Approximately 6 – 10 p.m. CT 7 – 11 p.m. ETApplication sign-in interruption
Microsoft sign-in is expected to be unavailable for approximately two to four hours beginning around 6 p.m. CT / 7 p.m. ET. During this window, you may be unable to start a new session in applications such as Zoom, Workday and the ServiceDesk Portal.
- Zoom: If your computer stays on and you remain signed in, Zoom should continue to work. If you restart or sign out, you may not be able to sign back in until maintenance is complete.
- Workday: An active session should continue to work. If the session times out, you may not be able to sign back in until authentication is restored.
- Expected recovery: Applications that use Microsoft 365 sign-in are expected to return to normal by late Friday night.
Extended interruption
Email and Documents
Email and your My Documents/Documents folders will have the longest period of downtime during the weekend.
Operating normally
Uninterrupted: Computer login and Avatar
Signing in to your Centerstone computer and accessing Avatar are not expected to be affected by this maintenance.
After migration is complete
You may need to finish setup on your computer or mobile device
Expected Sunday night or Monday morning: depending on your computer and how you use Microsoft 365, you may need to complete the Desktop Update Agent process, reconnect Outlook on your phone, re-share OneDrive content or replace saved OneDrive and SharePoint bookmarks.
What you need to do
Complete before migration begins Friday, August 14
Before migration
-
Plan for email and Documents downtime.
Email and your My Documents/Documents folders will be unavailable for an extended period over the weekend.
-
If you have shared files or folders from OneDrive, run the sharing report.
The report lists the files and folders you shared and the people who have access. Use it as a reference when sharing them again after migration.
Show me how to create the report -
Prepare your Centerstone-issued computer by 6 p.m. CT / 7 p.m. ET Friday, August 14.
If needed, sign in to your computer. Close Outlook and OneDrive, then lock the computer and leave it powered on when possible. Do not restart or shut it down unless instructed by IT.
Show me how to prepare my computer
Begin only after migration is complete
After migration
Trouble accessing email or your files?
While your desktop applications are unavailable or being reconnected, use myapps.microsoft.com to access your email and Microsoft 365 files in a web browser.
Open myapps.microsoft.com-
Please complete the synchronization of your Microsoft desktop applications.
You can use Microsoft applications in your browser while completing the desktop sync.
Open the synchronization instructions -
If you use Outlook on a mobile device, reconnect your account.
Choose your phone to see where to begin:
-
If you shared OneDrive files or folders, share them again.
Use your saved report as a reference. Content that someone else shared with you may also need to be re-shared by its owner.
-
If you saved OneDrive or SharePoint bookmarks, replace them.
Old favorites will no longer lead to the correct Microsoft 365 environment.
Open the bookmark instructions
Step-by-step guides
Open the guides that apply to you and follow the steps in order.
Your screen may look slightly different depending on your phone, browser or software version.
Do this before migration begins
The report gives you a reference list for restoring sharing after the move. It may take several minutes to generate.
View Instructions (PDF)Open the sharing report tool
Sign in with your current Legacy Centerstone Microsoft 365 account if asked.
Run the report
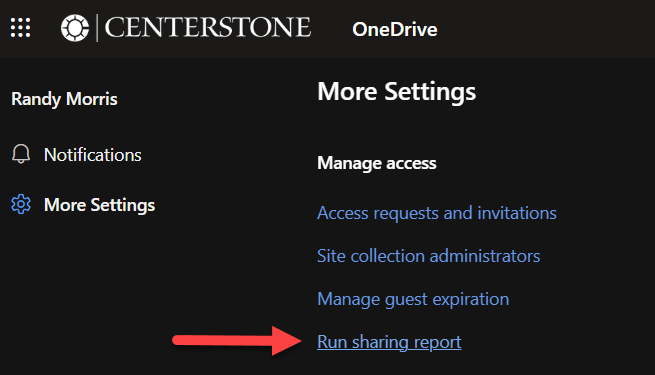
On the page that opens, select Run sharing report.
Choose where to save it
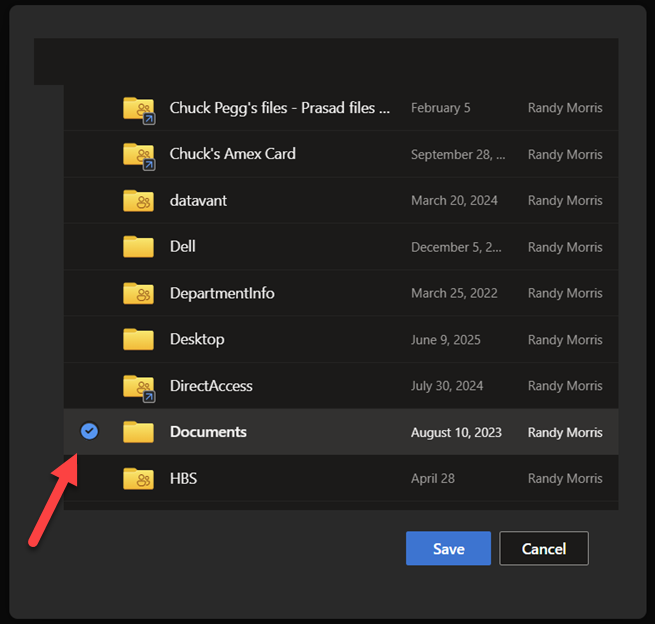
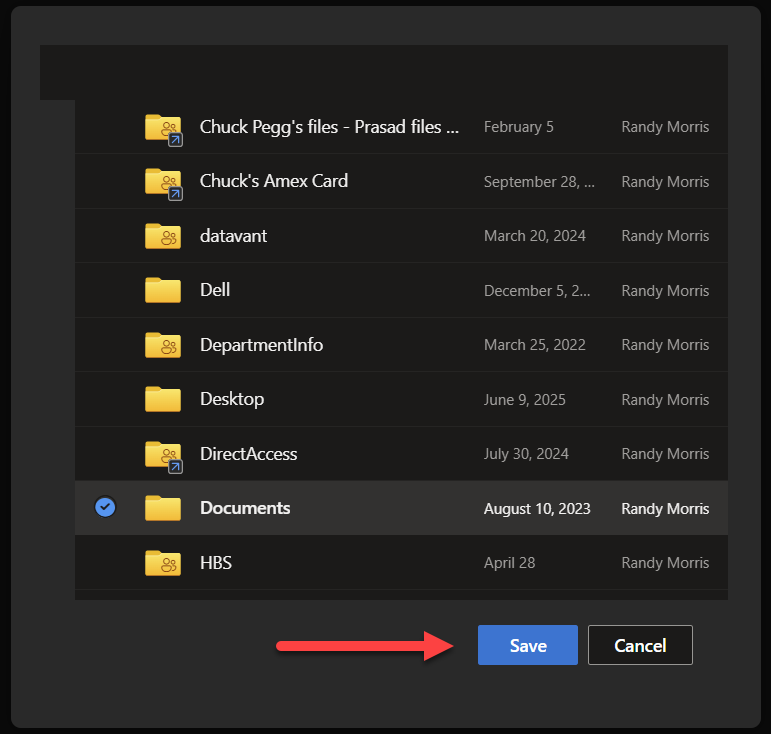
In the pop-up window, browse to a folder inside your OneDrive, select that folder and then select Save.
Wait for the notification email
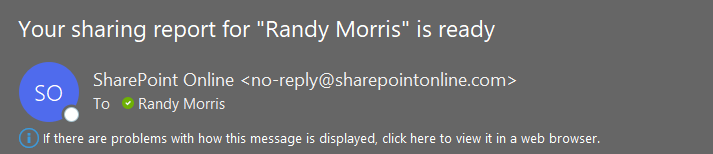
When the report is ready, you will receive an email with a subject similar to Your sharing report for ‘Your Name’ is ready. If it does not arrive, check Junk or Spam and allow additional processing time before rerunning the report.
Open and review the report
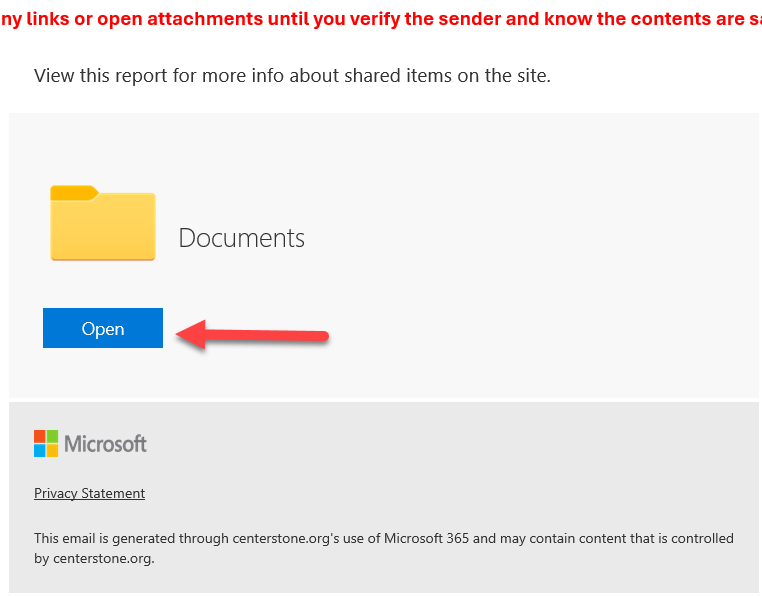
Select Open in the notification email. In the OneDrive folder, find a CSV file named in a format such as JohnSmith_2026-06-24.csv, then select it to open it in Excel Online.
| Column | Column name | What it tells you |
|---|---|---|
| A | Resource Path | The OneDrive file or folder that you shared. |
| E | User Email | The email address of the person who had access. |
Keep this report until you have restored the sharing you still need after migration.
Complete these steps by 6 p.m. CT / 7 p.m. ET
Legacy Centerstone team members should complete these steps on Friday, August 14.
Sign in to your computer
If you are not already signed in, sign in to your Centerstone-issued computer.
Close Outlook and OneDrive
Close Outlook
- Save or send any messages you are currently working on.
- Select the X in the upper-right corner of the Outlook window.
- Confirm that Outlook is no longer open on your screen or shown as an active application on the taskbar.
Close OneDrive
- Locate the blue or white OneDrive cloud icon near the clock in the lower-right corner of your screen.
- If you do not see the cloud icon, select the up arrow (^) to display hidden icons.
- Select the OneDrive cloud icon.
- Select the gear icon in the upper-right corner of the OneDrive window.
- Select Quit OneDrive, then confirm when prompted.
 near the clock in the lower-right corner of your screen.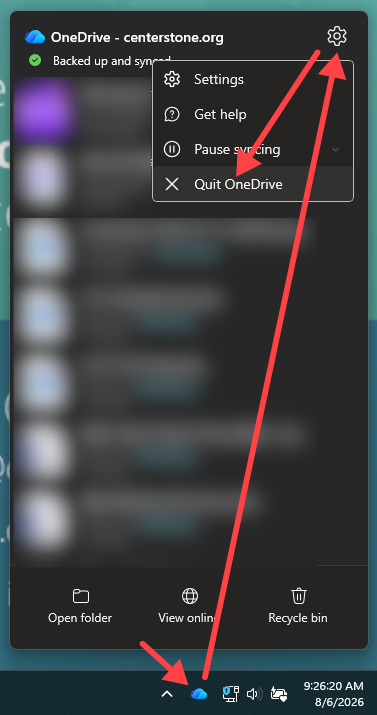
Lock your computer
Press the Windows key plus L to lock your computer, but leave it powered on.
Leave your computer powered on and locked
When possible, leave the computer powered on and locked throughout the weekend. Do not restart or shut down the computer unless instructed by IT.
When you return Monday, August 17
Completing these steps will provide the best experience when you begin work.
If these steps are not completed, Outlook and OneDrive may take additional time to become available Monday morning.
What to expect
If you have previously rebooted as directed, the Desktop Update Agent should launch within 20 minutes. You may then follow the steps below. If you’d like to avoid the wait, search for “On Demand Migration Desktop” in the start menu. Click ‘open’ and follow the instructions below.
The Desktop Update Agent will guide you through several Microsoft 365 application updates. The process includes Microsoft 365 licensing, Outlook, OneDrive, and Teams. Follow the prompts when they appear and allow each process to complete before continuing.
Overview
The On Demand Migration Desktop Update Agent will guide you through the required Microsoft 365 application updates. You may be prompted to make selections during the process.
- Microsoft 365 App License
- Microsoft Outlook
- Microsoft OneDrive
- Microsoft Teams
Important
Do not close the Desktop Update Agent while a process is running unless you are instructed to do so. If you encounter an issue or are unsure how to respond to a prompt, contact the Help Desk.
Microsoft 365 App License
When the On Demand Migration Desktop Update Agent window appears, click Start. This will begin the Microsoft 365 App License process. Allow the process to complete before continuing.
Microsoft Outlook
After the Microsoft 365 App License process is complete, the Microsoft Outlook process will begin. During this process, you may see a prompt indicating that Outlook is checking for an updated version.
If a new version of Outlook is available, follow the prompts shown on your screen:
- Select Microsoft 365.
- Click Continue.
- Allow the process to complete.
Microsoft OneDrive
After the Microsoft Outlook process is complete, the Microsoft OneDrive process will begin. If OneDrive is currently running, you may be prompted to close OneDrive. Follow the on-screen instructions.
You may then be prompted to complete several setup steps:
- Follow the on-screen prompts.
- If prompted, select Use this folder.
- If prompted, select Not Now.
- Select Open my OneDrive folder.
- Once the OneDrive folder opens, you may close the window.
Microsoft Teams
After the Microsoft OneDrive process is complete, the Microsoft Teams process will begin. If the Start button is grayed out, open Microsoft Teams first.
- Return to the On Demand Migration Desktop Update Agent.
- Click Start.
- Follow any prompts that appear when Teams opens.
Process complete
Once the Microsoft Teams process is complete, all required steps have been completed. You may continue using your computer normally.
Need help?
If you encounter any issues during the process or are unsure how to respond to a prompt, please contact the Help Desk for assistance.
iPhone users: Start here
Use Microsoft Edge to clear the old Microsoft accounts before removing and adding your Outlook account.
View Instructions (PDF)If Company Portal was previously downloaded
Go to Settings > General > VPN & Device Management, click the account, then remove the account.
Then continue with the instructions below.
Download Microsoft Edge
Download Edge from the App Store.
Respond to the opening prompts
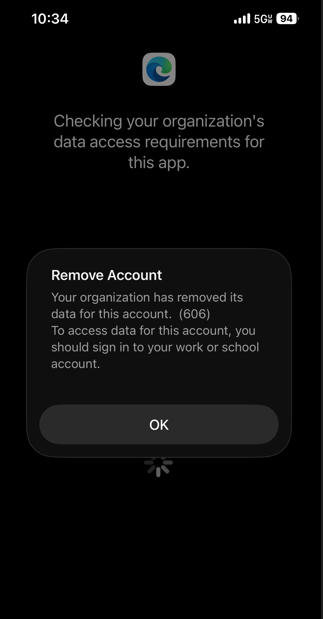
If you previously had Edge, when you open the application, click OK to remove the account:
If prompted to make Edge the default browser, choose not to.
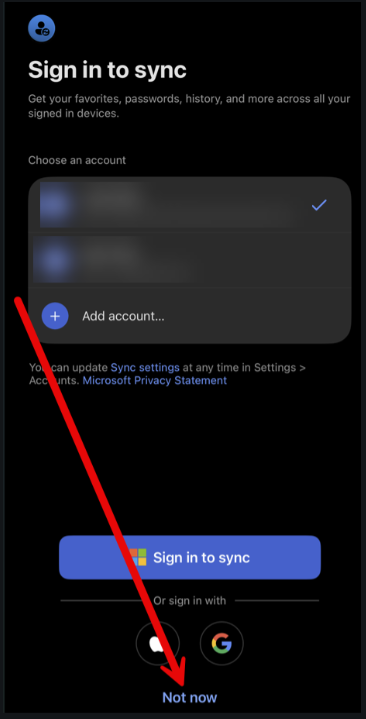
If Edge was just installed and prompts you to “sign in to sync,” select “Not now.”
Find the ‘Search or ask anything’ bar
It will take you to a blank page:
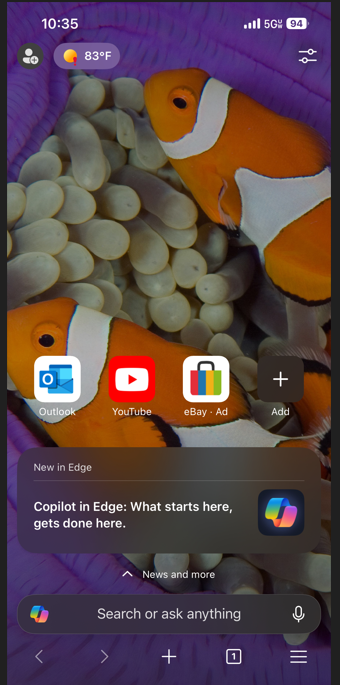
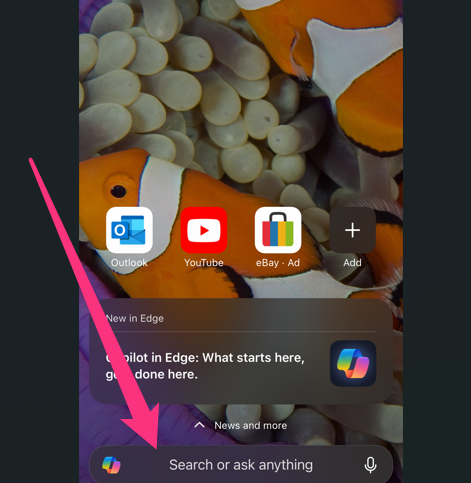
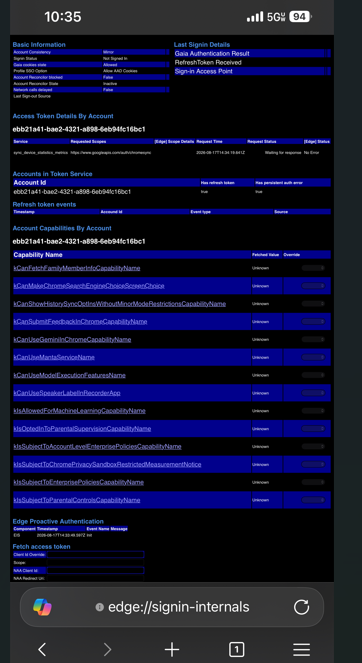
Type in the “search or ask anything” bar:
edge://signin-internals/
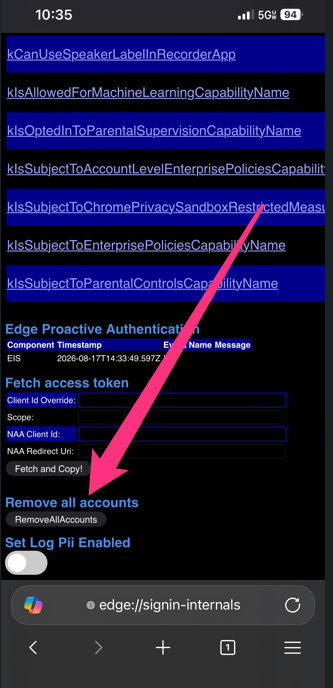
Remove all accounts
Zoom in at the bottom to click REMOVE ALL ACCOUNTS
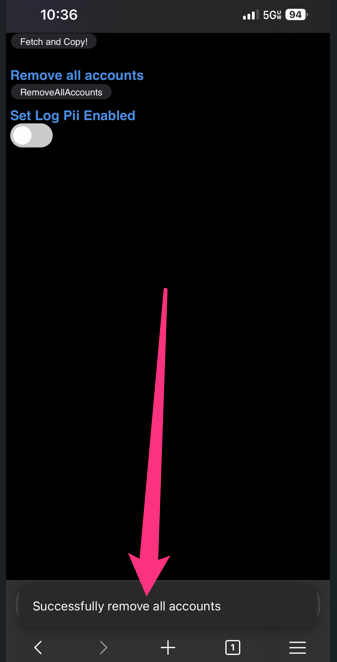
Confirm the accounts were removed
It will return Successfully remove all accounts:
Close Edge and follow instructions to remove and add your Outlook.
Wait until migration is complete
Only remove your Centerstone account from Outlook after the Microsoft 365 migration is complete, expected Sunday night or Monday morning.
View Instructions (PDF)Before you begin
- Your Centerstone email address
- Your Microsoft 365 password
- Access to your multi-factor authentication method
- An internet connection
Your mailbox is safe
Removing the account from the Outlook app does not delete your mailbox, emails, calendar, contacts or anything stored in Microsoft 365.
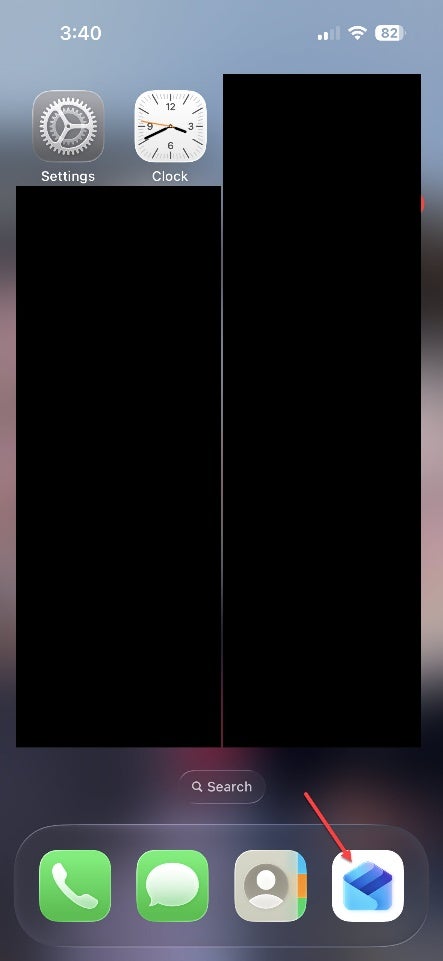
Open Outlook
Find and open the Microsoft Outlook app on your phone.
Open Outlook settings
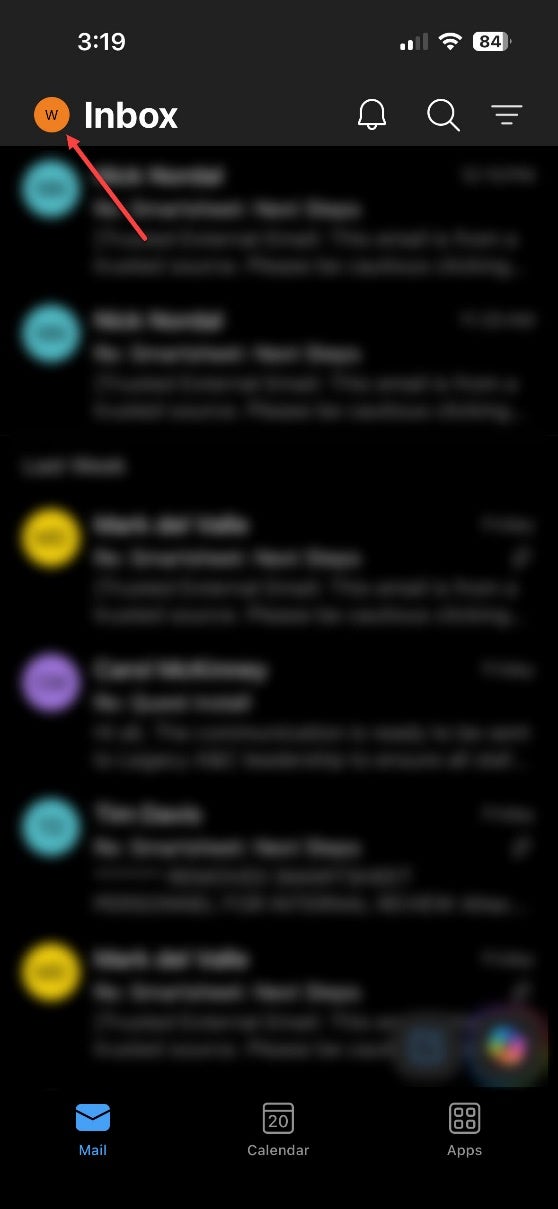
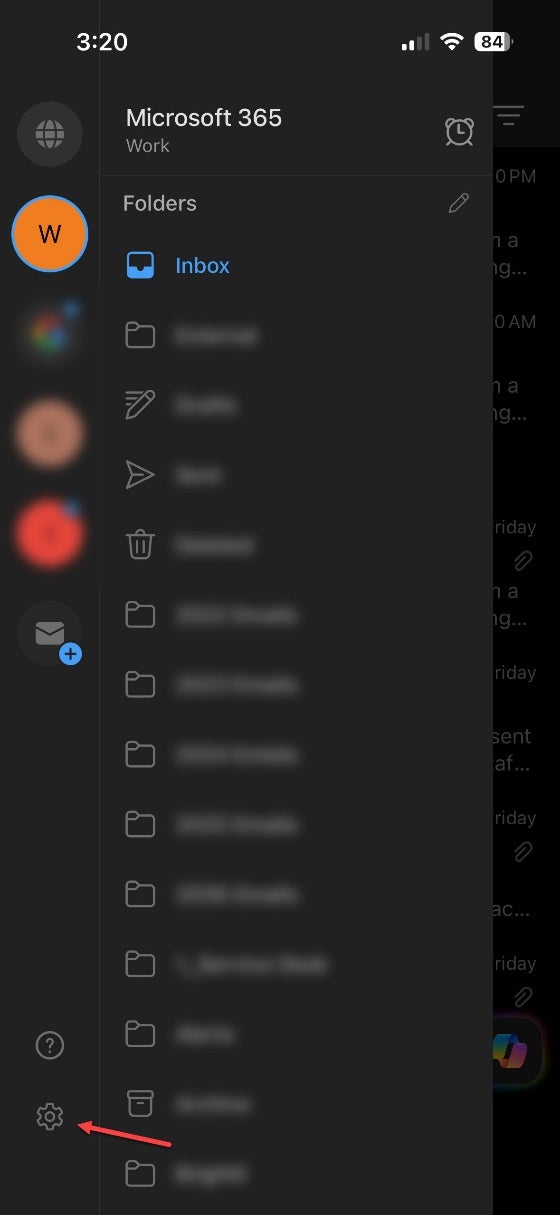
Tap your profile picture or initials in the upper-left corner, then tap the gear icon in the lower-left corner.
Select your existing work account
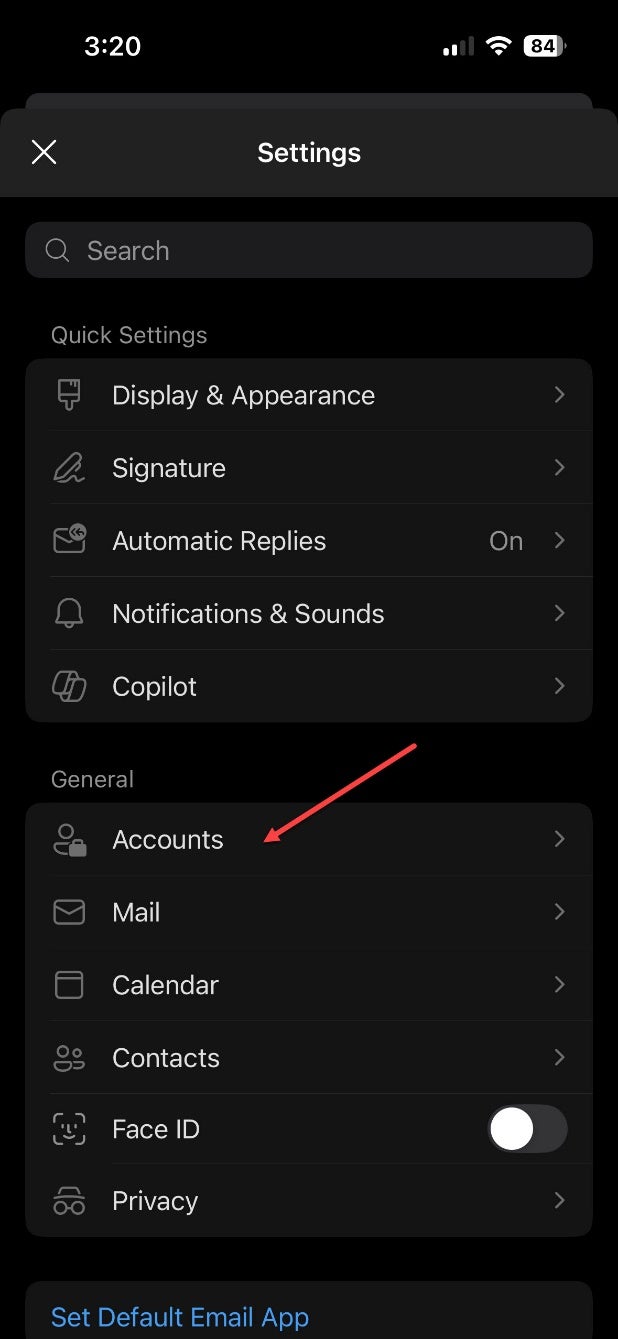
In Settings, tap Accounts. Under Accounts, select your Centerstone Microsoft 365 work account.
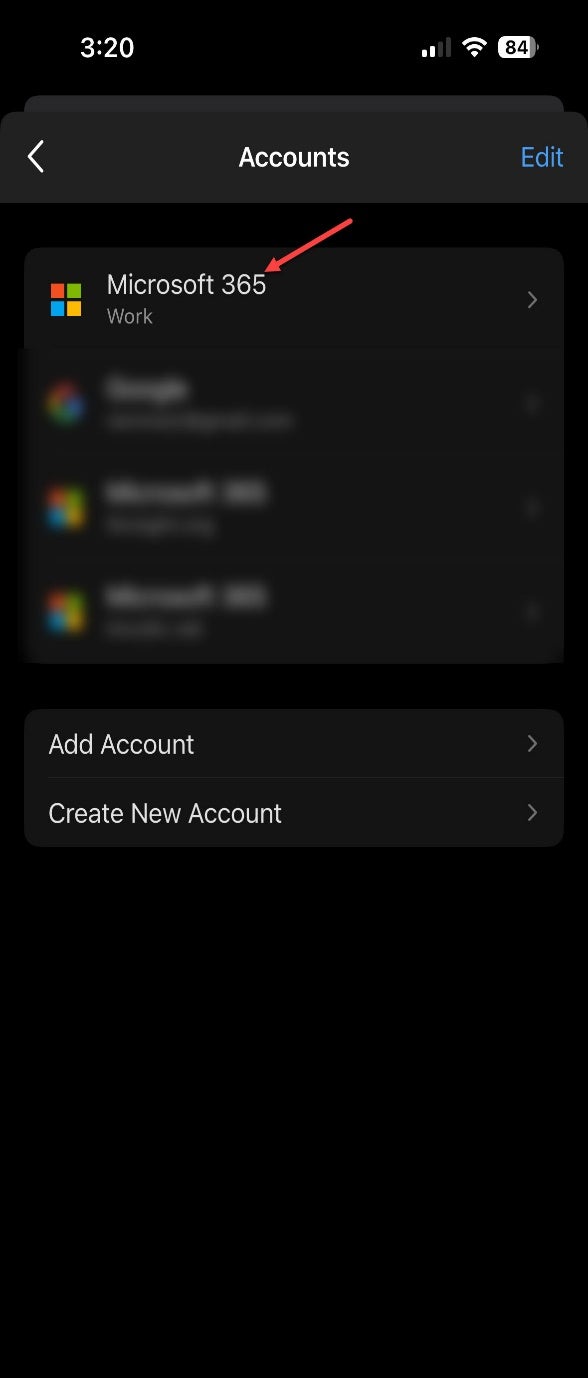
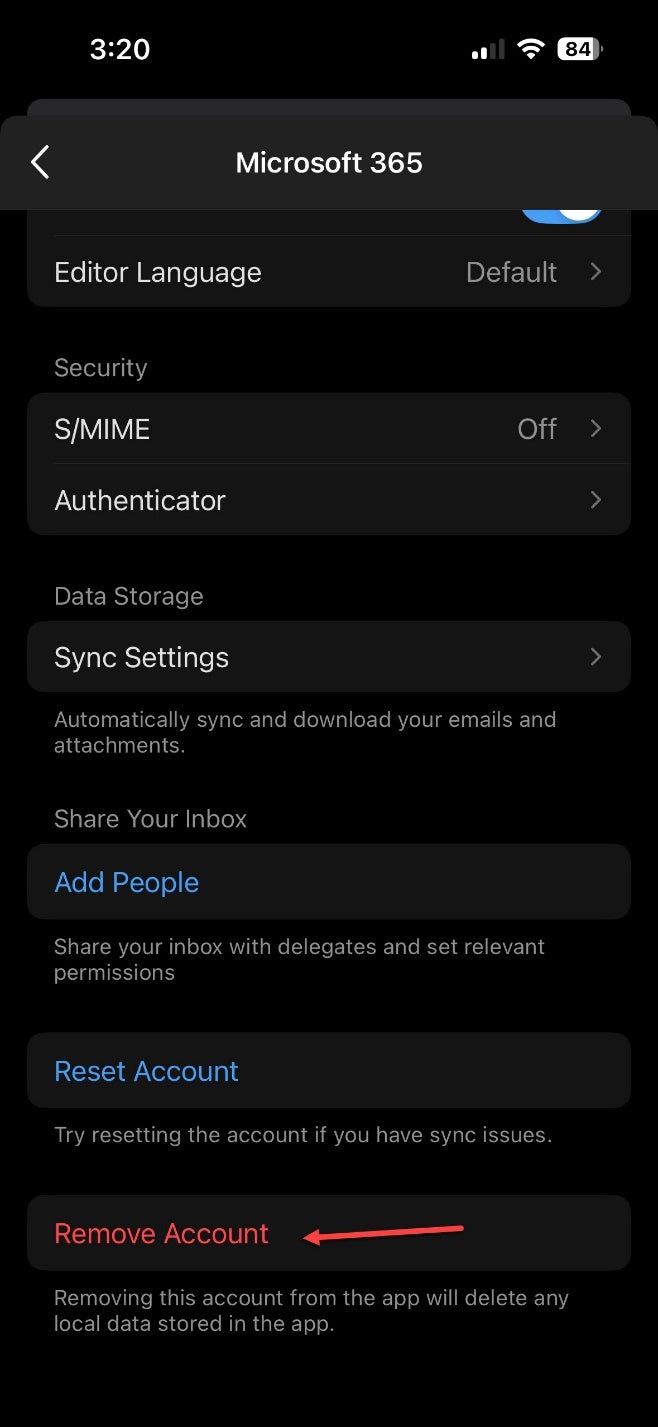
Remove the account from the app
Scroll to the bottom of the account settings, tap Remove Account, then tap Remove again when your phone asks you to confirm.
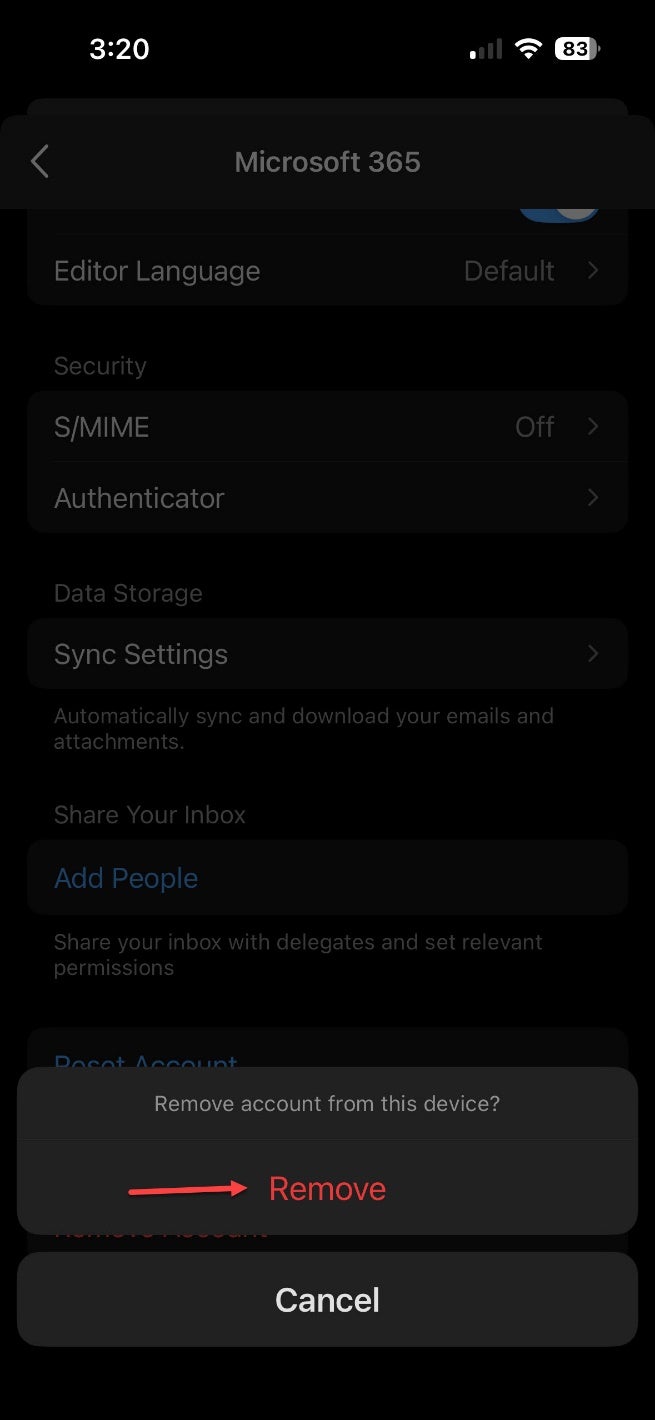
Your work account is now removed from the Outlook app.
Already have Outlook installed?
Skip the app-store instructions and begin with Step 2, Open Outlook and add your account.
View Instructions (PDF)Install Microsoft Outlook if needed
Open your phone’s app store, search for Microsoft Outlook, and install the official app published by Microsoft Corporation.
iPhone
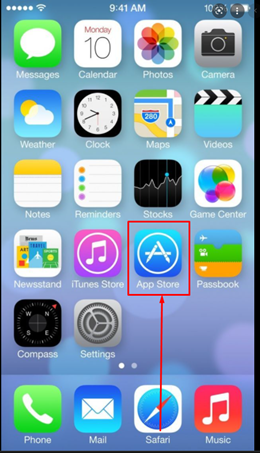
1. Open App Store
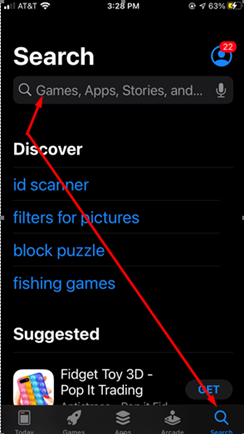
2. Search Outlook
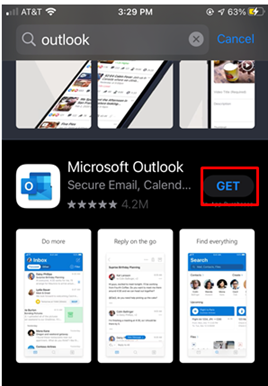
3. Tap Get
Android
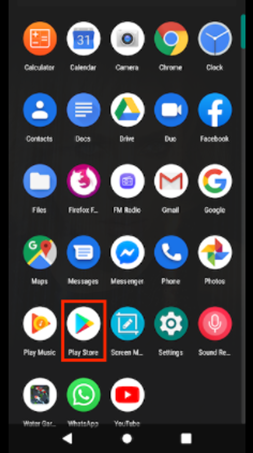
1. Open Play Store
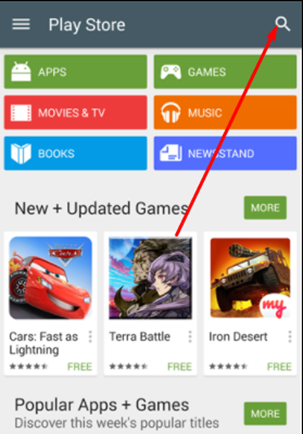
2. Search Outlook
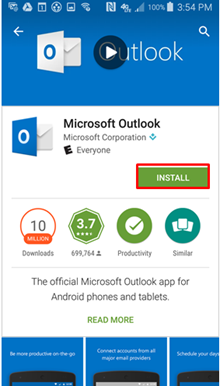
3. Tap Install
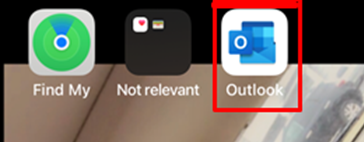
Open Outlook and add your account
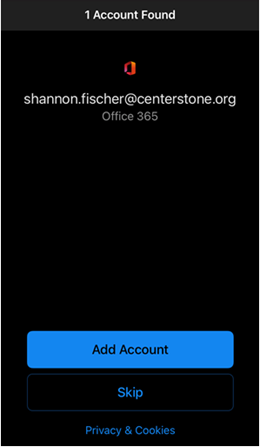
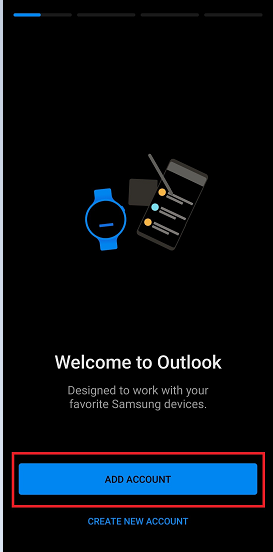
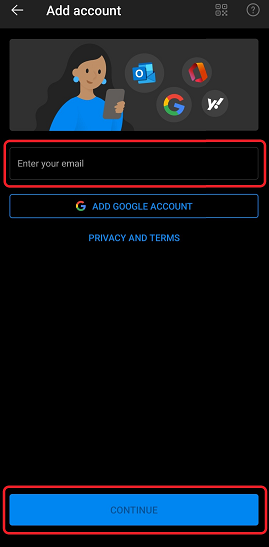
Open the Outlook app. Depending on what appears, tap Add Account on the welcome screen or the account-found screen.
Enter your Centerstone email address
If Outlook did not fill in your email address, enter it, select Continue, then select Sign in. Enter your Microsoft 365 password and follow the sign-in prompts.
Follow any phone-security prompts
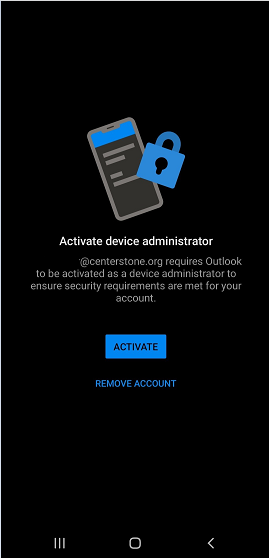
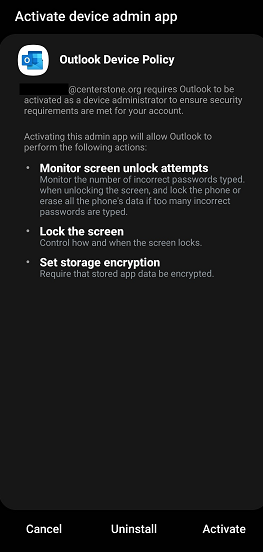
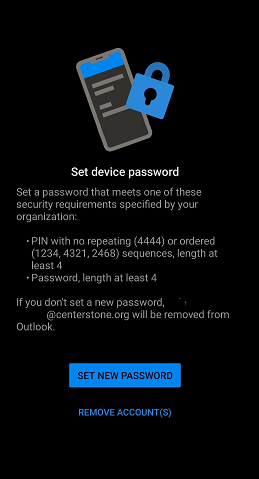
On Android, you may be asked to activate device administration and set or confirm a secure device passcode. Follow the prompts shown on your phone.
Finish setup
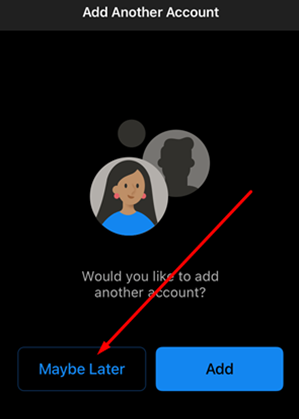
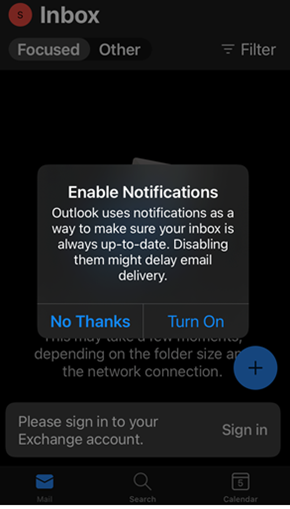
If Outlook asks whether you want to add another account, select Maybe Later. Notifications are optional; choose the setting you prefer. Your email should begin loading automatically.
The SharePoint and OneDrive web addresses will change. Delete browser bookmarks that use the old addresses and create new ones using the destinations below.
View Instructions (PDF)| Service | Old address to replace | New destination |
|---|---|---|
| SharePoint | centerstoneorg.sharepoint.com |
brightli.sharepoint.com/sites/centerstoneorg/ |
| OneDrive | centerstoneorg-my.sharepoint.com |
brightli-my.sharepoint.com |
Microsoft Edge
- Open Edge and select the Favorites star in the toolbar, or press Ctrl + Shift + O.
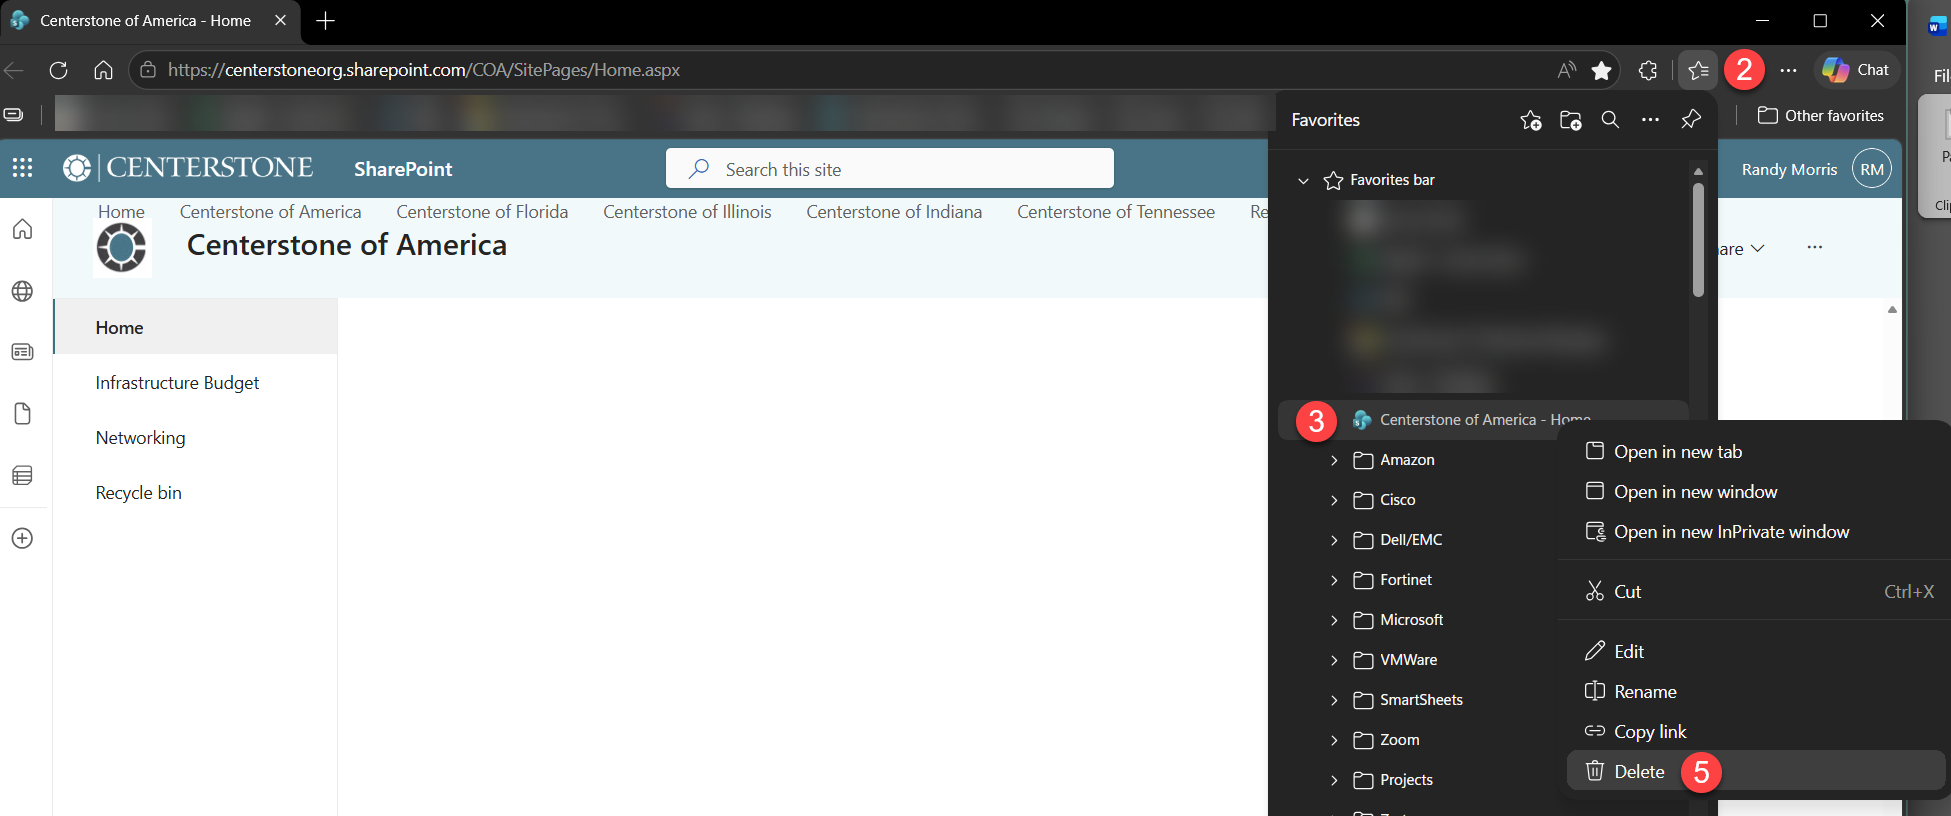
- Find the old SharePoint or OneDrive favorite, right-click it and select Delete.
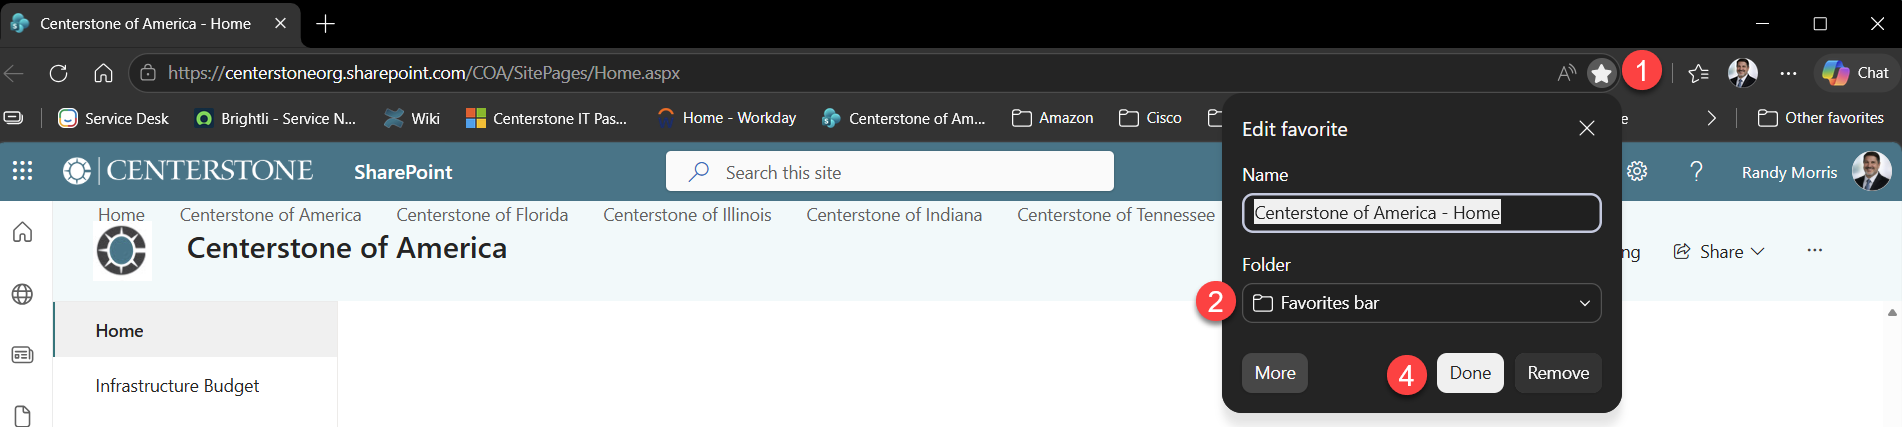
- Open the new destination from the table above, select the star in the address bar, choose a folder and select Done.

Google Chrome
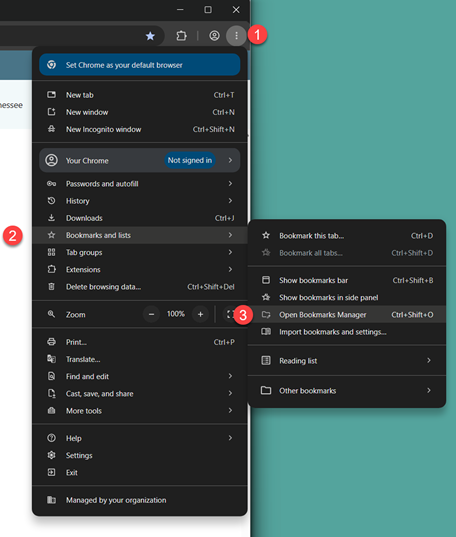
- Open Chrome, select the three-dot menu, then choose Bookmarks and lists > Bookmark manager.
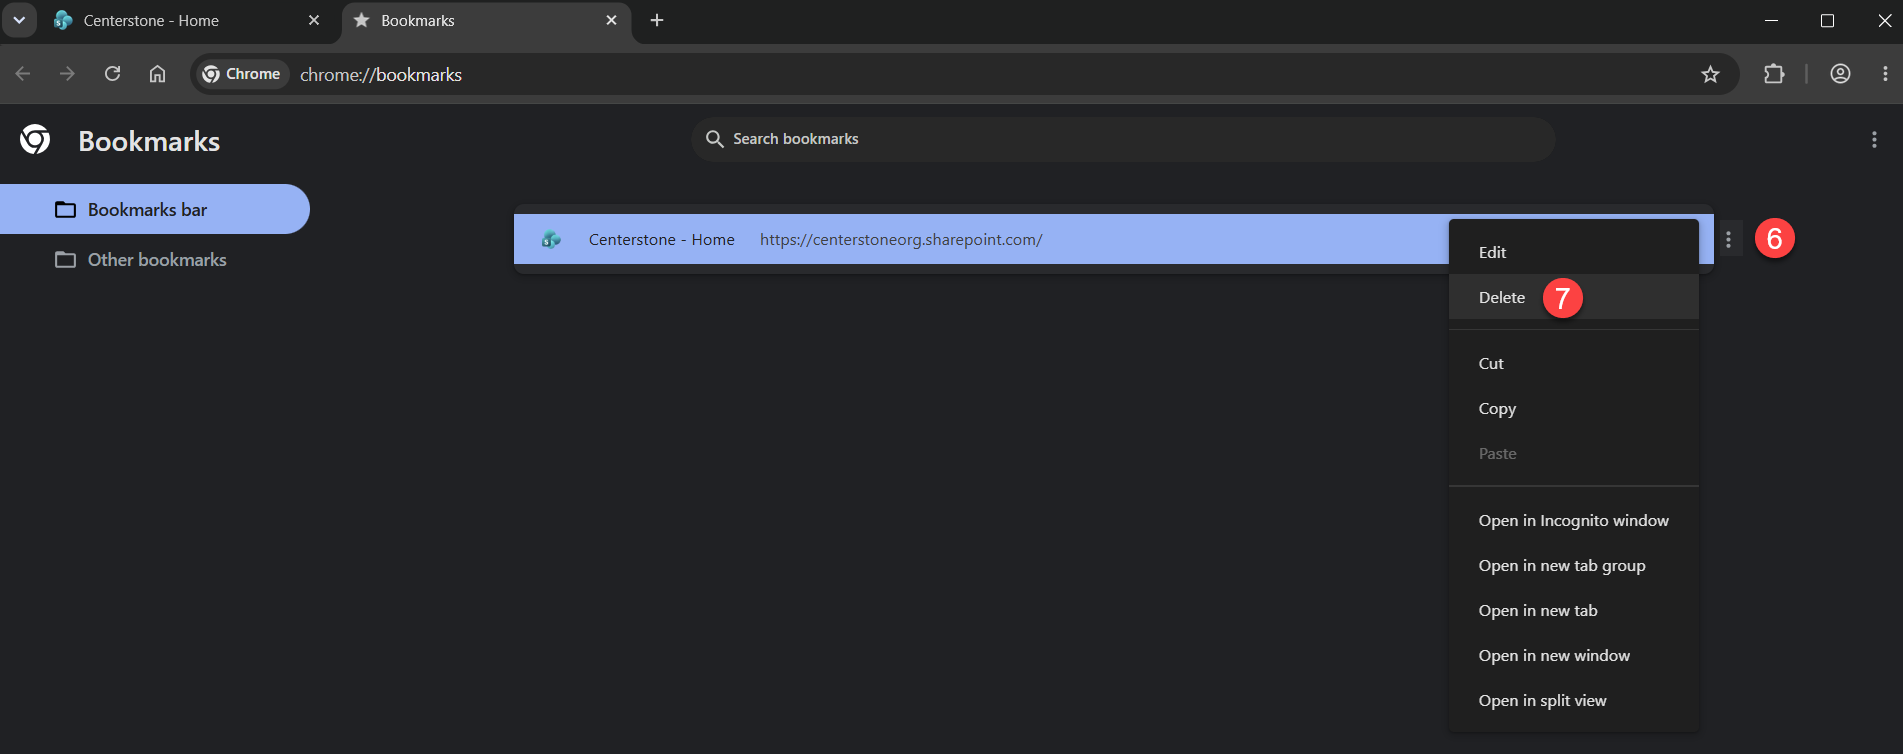
- Find the old SharePoint or OneDrive bookmark, select its three-dot menu and choose Delete.
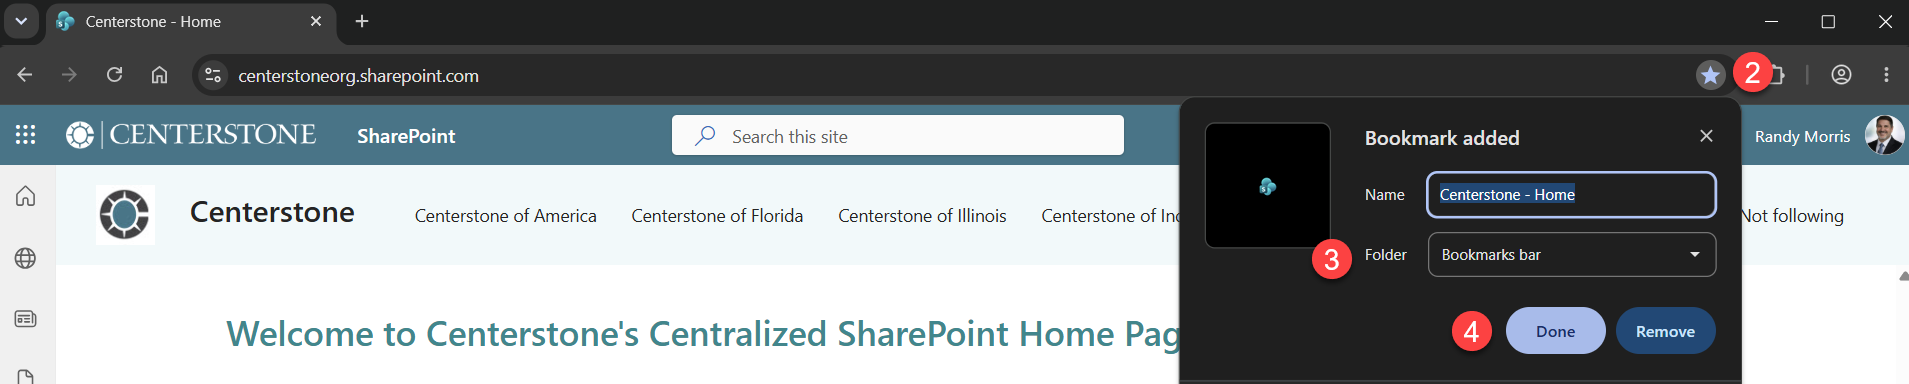
- Open the new destination from the table above, select the star in the address bar, choose where to save it and select Done.
Outlook & Teams after migration
Review what to expect in Outlook and Teams and complete any steps that apply to you.
Historical Centerstone East User Accounts showing up in Outlook
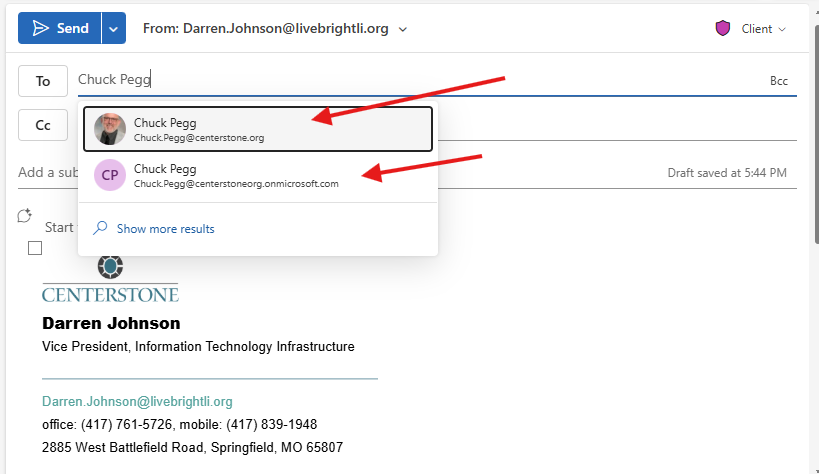
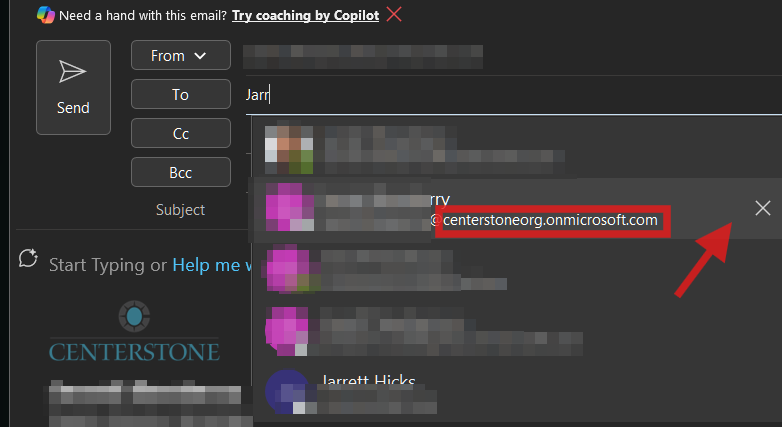
After the migration, old Centerstone East accounts may still appear in Outlook temporarily. For example, when creating a new email and typing a Centerstone East user’s name, the name may appear twice. Do not use the account ending in @centerstoneorg.onmicrosoft.com; instead, use the account with the @Centerstone.org domain. The old account should be removed within the next few days.
Removing Autocomplete Entries from Outlook
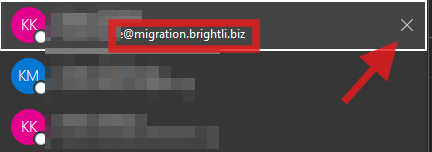
Centerstone West will most likely have older, cached addresses that are in autocomplete in the “To” address when composing or replying to e-mails. You will need to manually delete any addresses that end with @centerstoneorg.onmicrosoft.com or @migration.brightli.biz e-mail addresses. You will need to select the “x” next to those names to clear them out of your cache.
Outlook Calendar Meetings
If a Centerstone East user was assigned as a delegate for your Outlook calendar or inbox, you will need to add them again.
Delegates and Shared Inboxes will need to be reassigned
If a Centerstone East user was assigned as a delegate for your Outlook calendar or inbox, you will need to add them again.
Rules recreation
Users with accounts in both the Centerstone East and Centerstone West tenants may have lost their Outlook rules during the migration and will need to recreate them.
Missing Members in Centerstone East Distribution Lists
Centerstone West users assigned to Centerstone East distribution lists were removed during the migration and will need to be added back.
Outlook Appointments Created by Centerstone East Users That Include Teams
If a Centerstone East user created a meeting before the migration that included a Teams virtual conference option, participants will no longer be able to join because the original meeting ID is no longer valid. To resolve this, delete and resend the meeting so a new Teams meeting ID is generated and shared with participants.
Historical Centerstone East User Accounts
After the Centerstone East migration, any Microsoft Teams team, chat, or channel that included a Centerstone East user must have that user re-added. The migration created a new Teams account for each user, while the old account is being removed over time, the old account will appear with [External] next to the user’s original name.
If you send a message to the old Centerstone East account, you will receive an error, and the user will not receive the message. Select the user name that has the associated picture and/or account that has the @centerstone.org domain, not the @centerstoneorg.onmicrosoft.com.
Note, group chats that included a Centerstone East user, will need to re-add the user with the @centerstone.org domain after migration.
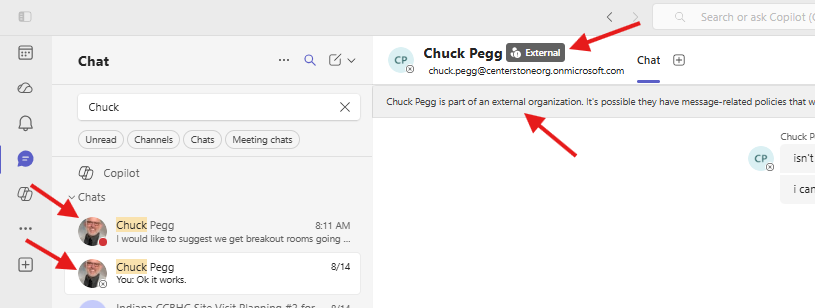
Because new accounts were created, existing chat sessions that include Centerstone East users will need to have those users re-added.
Tenant Access Issue
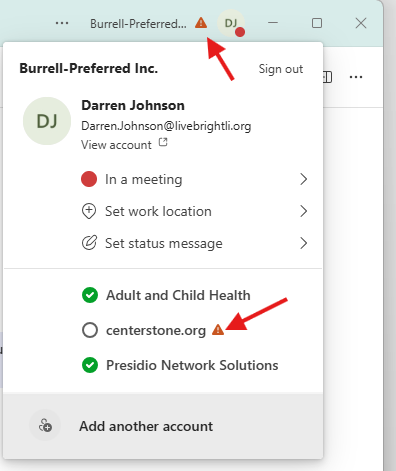
When you open Teams, you may temporarily see an issue icon next to your name. This is expected for the next few days and indicates that Teams is still showing the old Centerstone.org account, which is no longer available. We cannot remove that account immediately, but it will disappear automatically after a few days.
PDF guides
These instructions are also available as PDFs.
Before migration
Complete this before migration begins.
OneDrive sharing report instructions
Use before migration if you have shared files or folders from your OneDrive.
After migration
Use these only after migration is complete.
Synchronize your Microsoft desktop applications
Follow the Desktop Update Agent prompts for Microsoft 365 licensing, Outlook, OneDrive and Teams.
Set up Outlook on your iPhone
iPhone users should complete these steps before removing and adding their Outlook account.
Remove your Centerstone account from Outlook mobile
Part 1 of reconnecting Outlook on a mobile device after migration is complete.
Sign in to Outlook on your phone
Part 2 of reconnecting Outlook on a mobile device after migration is complete.
Replace OneDrive and SharePoint bookmarks
Use after migration if you saved OneDrive or SharePoint links in Edge or Chrome.
Outlook User Experience after M365 Migration
Post-migration Outlook guidance and any needed fixes.
Teams User Experience after M365 Migration
Post-migration Teams guidance and any needed fixes.
IT Help Desk
Need help?
The IT Help Desk can help with Microsoft 365 access, desktop application sync and activation, Outlook setup, OneDrive sharing and bookmark updates.
If the ServiceDesk Portal or email is unavailable during migration, remember you can reach the IT Help Desk by phone.